

Hyperx Cloud 2 Wireless Static Noise
Notice out the common reasons why you hear static in your headphones. And the best means to help you go rid of that annoying buzz.
One of the almost annoying inconveniences is when yous want to sit down and mind to some swell music, but but hear static noises or intermittent sound playing.
What'south worse is that no thing how much you dabble with your headphones or audio device, yous just can't seem to understand what'southward causing the problem. How will you be able to make the annoying static and buzzing sounds go away?
Luckily for yous, we've fabricated a comprehensive guide covering all the possible causes and solutions for getting rid of static in your headphones for different devices. Each method is dependent on the cause of the trouble, then it'southward of import that yous empathise what exactly is going on earlier you proceed in troubleshooting.
Why Do I Hear Static In My Headphones?
Information technology's important for you to know that there are a few possible causes or reasons as to why there is static noise coming from your headphones. Knowing the initial crusade of the problem tin can change the mode you address the effect with your DIY repair solutions.
Below are some of the possible causes of static noise and how you can troubleshoot this problem accordingly.
- Wrong Sound Settings
- Loose or Asunder Wires
- Auxiliary Port Problems
- Damaged Headphones Speaker
- Static Dissonance From Wireless Headsets
Loose or Disconnected Wires
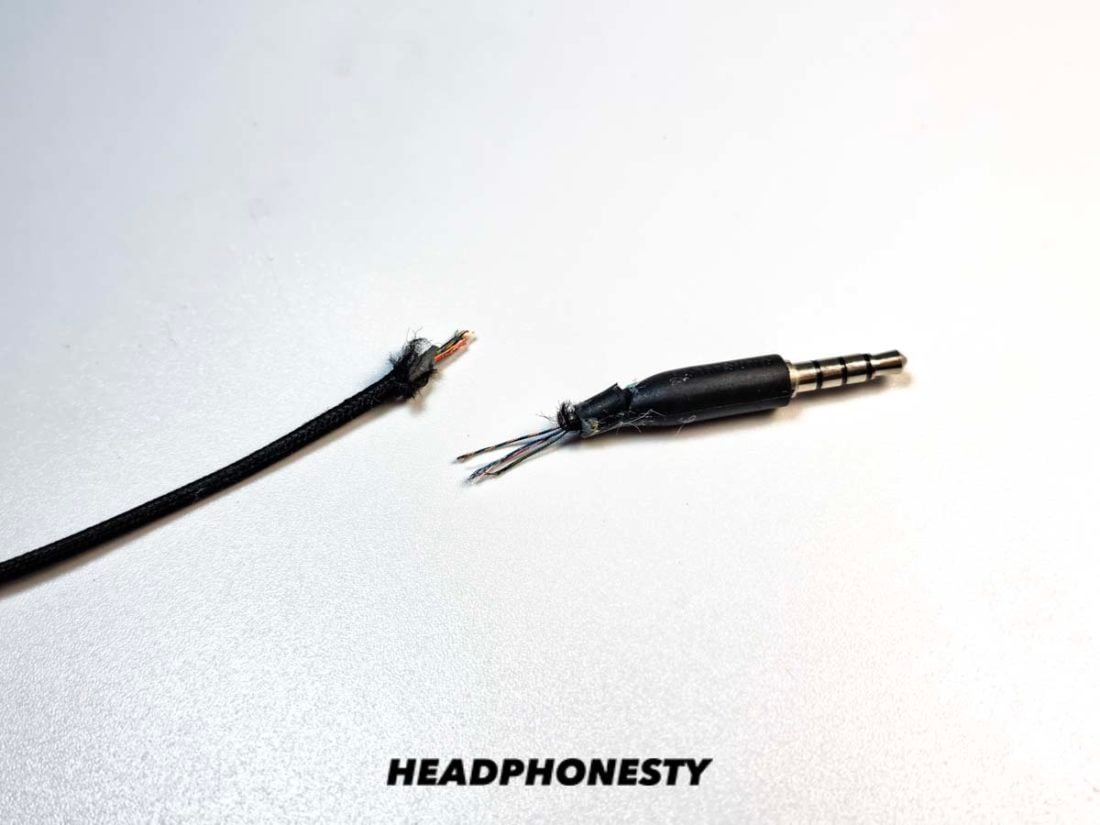
Although near headphones are generally well-built, in that location is a possibility that the internal wiring of the headphones may be damaged. This can be another reason why yous hear static in your headphones. The internal headphone wires are weakest at the connecting signal with the 3.5mm sound jack.
Some people tend to tug on the expanse simply below the plastic casing of the jack and this can put unnecessary stress on the internal wires causing them to become loose or asunder. When connecting or disconnecting your wired headphones to a device, always hold it on the audio jack. Do Non tug on the wire.
This besides causes unnecessary stress to the headphone plug. And can sometimes outcome in more severe damages. If that's the case, cheque out our article on how to prepare a aptitude headphone jack.
If yous have the proper tools at hand and desire to know how to set the static noise due to your headphone wires, refer to this detailed guide on fixing headphone wires to make the necessary repairs.
Auxiliary Port Issues
Another issue that can occur is that the audio port of your playback device is the one causing the static noise. This usually happens when the within of the auxiliary port of the device is muddied and oxidized which affects the quality of audio of your headphones.
To fix the problem all you have to do is make clean the auxiliary port until the clay is gone and the scratchy static noise can't be heard anymore. Follow our guide on how to fix a loose headphone jack for the different ways to do this efficiently.
If you've cleaned the device's aux port simply still hear the static noise, you can always endeavour cleaning the sound jack of your headphones as well until the problem is resolved.
Damaged Headphone Speaker
Checking headphone'due south hardware should be the first step when troubleshooting and then that you lot don't waste time fiddling with your audio device'south settings. To know if damaged headphone speakers are the reason why y'all hear static in your headphones, simply plug it in a trusted audio playback device that y'all know is working properly and see if the static racket tin can even so exist heard.
If the sound persists, then it is most likely a hardware issue with your headphones. It may be best to discover replacement headphones or brand employ of your headphone'south warranty if information technology is all the same bachelor.
Static Noise From Wireless Headsets
Hearing static on your wireless headphones are more common than y'all recall. Information technology'south worth noting that using wireless headphones makes you lot more susceptible to hearing static or buzzing sounds due to interferences from other devices or objects in the area.
You tin solve this by making sure that at that place are no barriers between your Bluetooth headphones and the audio device. Things like a metal desk or using the headphones in the other room can affect the connectivity and overall sound quality.
Wrong Audio Settings
In some cases, the master reason why there is static in your headphones is not because of the headphones itself, only rather the incorrect sound settings prepare on your playback device.
So if y'all were able to determine that the headphone static isn't caused by loose wiring, faulty headphone speaker hardware, aux port issues, or Bluetooth frequency interferences, then the trouble may exist solved by changing your sound playback device's settings.
Yet, keep in heed that the procedure of fixing this problem tin can vary depending on what audio device you lot're using.
How to Gear up Headphone Static Noise Issue on Your Mac
Experiencing static noise and other sound problems is more probable to happen right after a MacOS update. A quick fix for this problem would be to simply restart your estimator, but if restarting is not an selection or if it doesn't seem to piece of work, then the following steps may work.
- Connect your headphones to your Mac computer.
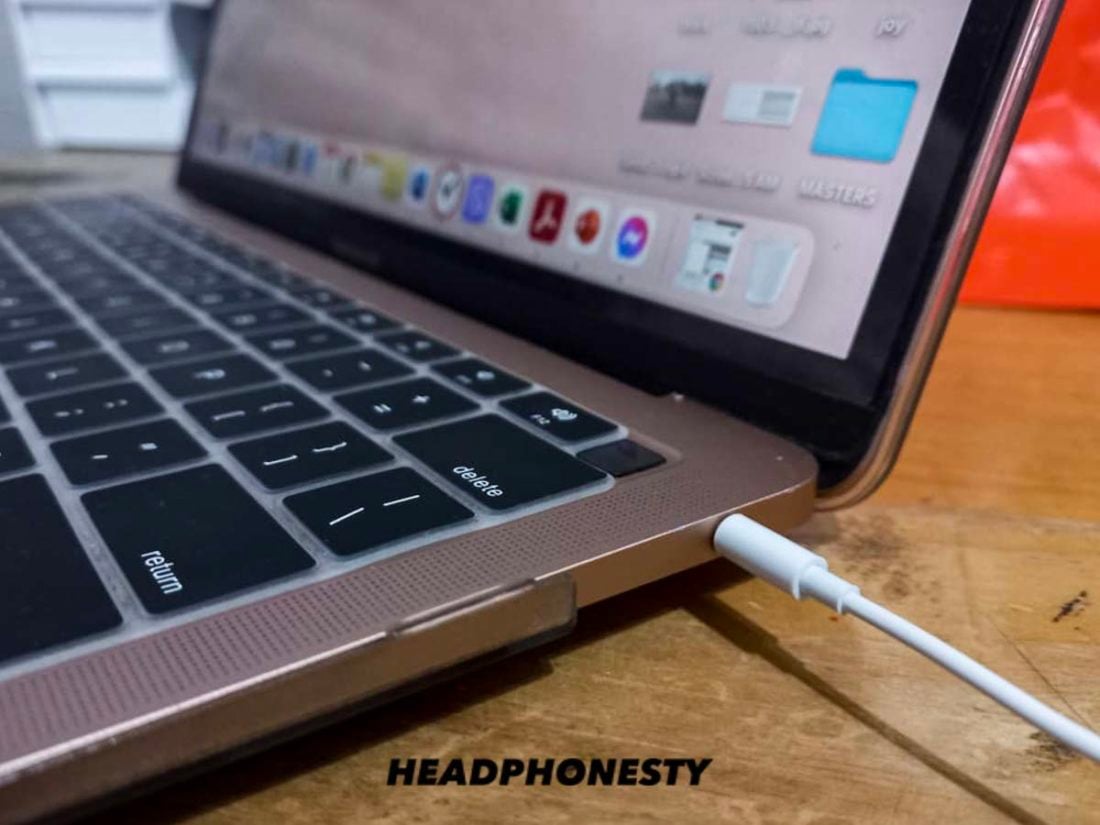
Headphones plugged on Mac - Go to System Preferences and select Audio. You lot should now be under the Sound Effects tab.
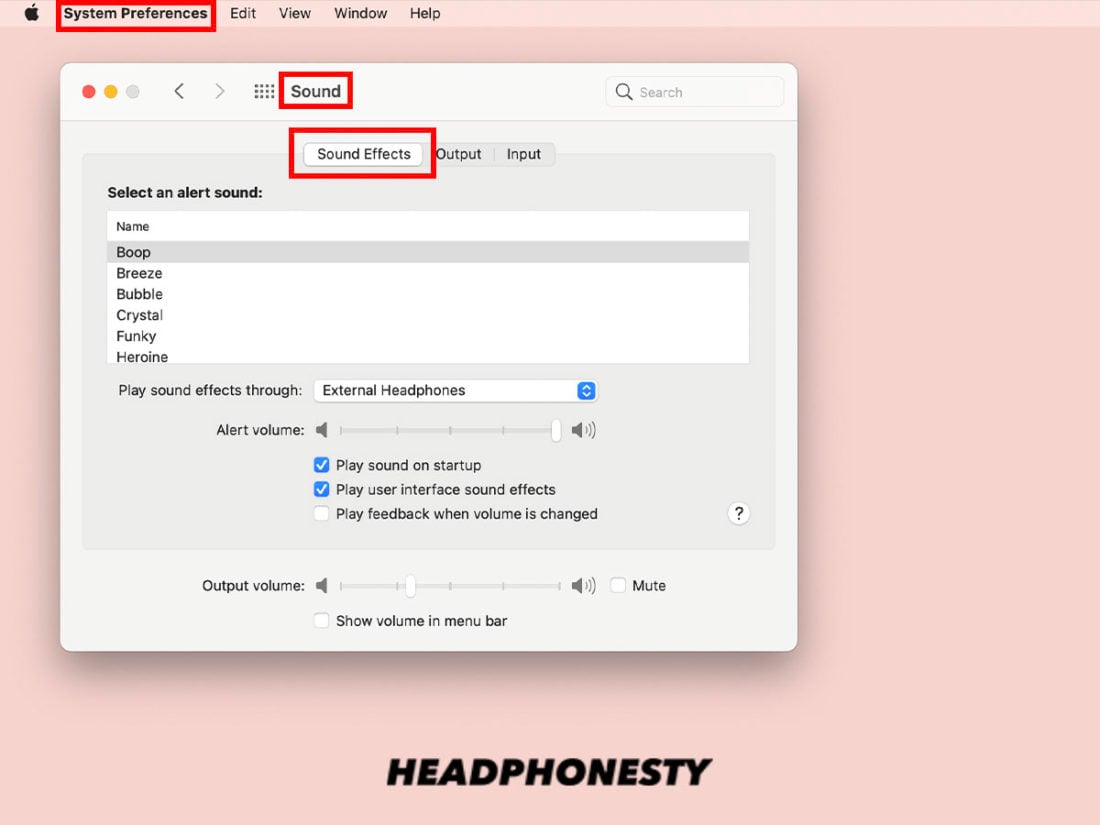
Mac Sound Effects tab - Double-check that the selected output device is your headphones.
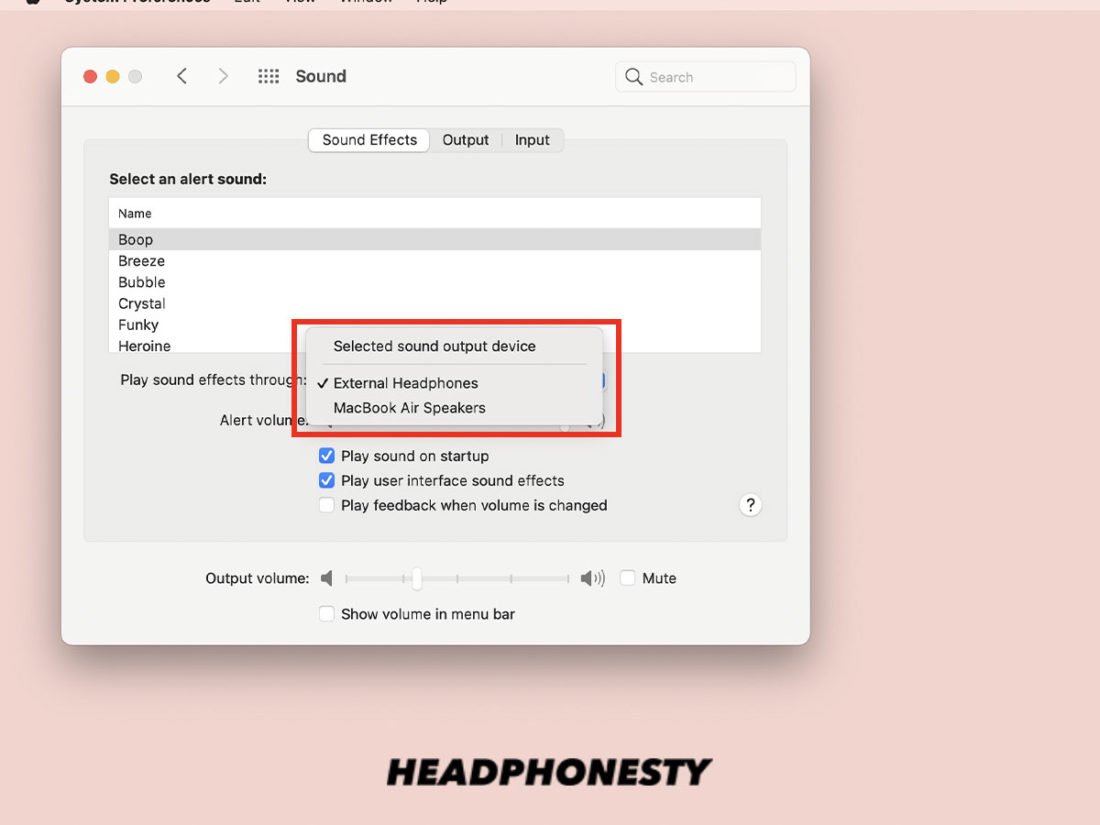
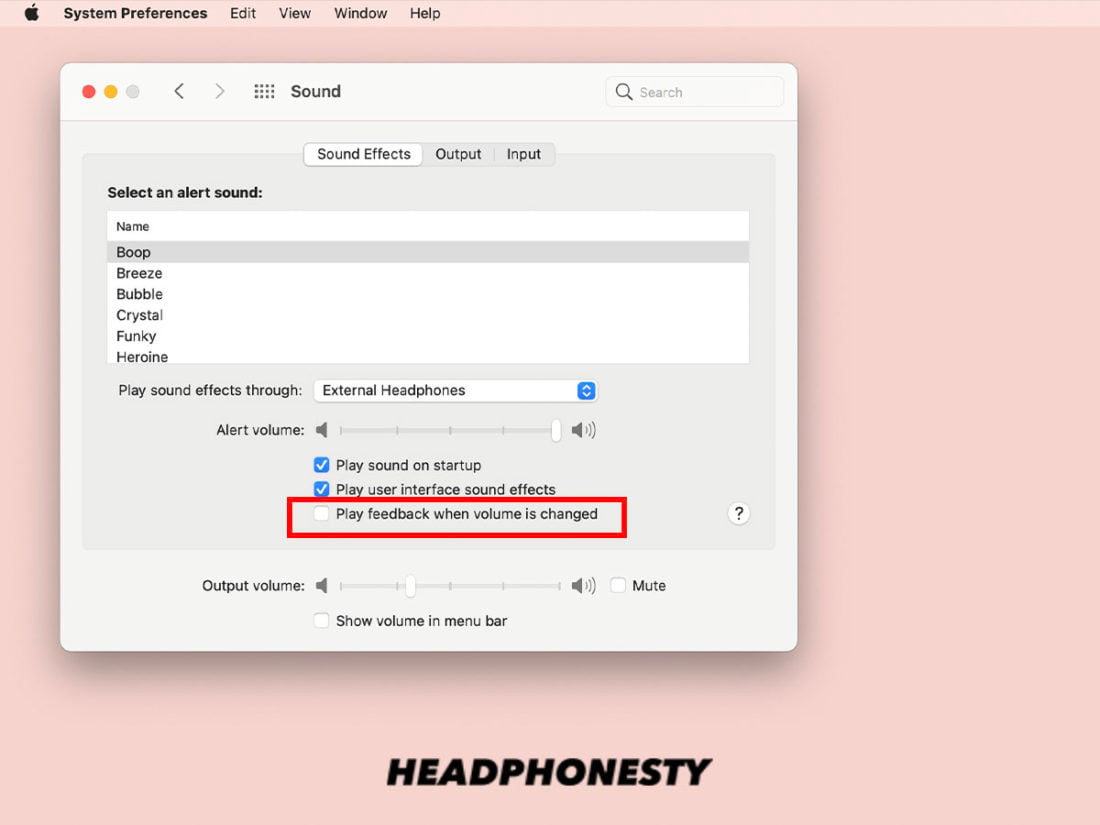
Your headphones as the select output device - Uncheck the "Play feedback when volume is changed" tickbox, then toggle information technology on and off while checking your headphones if the static noise disappears.
Play feedback when volume is inverse
Other Troubleshooting Options for Mac:
If the higher up steps don't piece of work, try this.
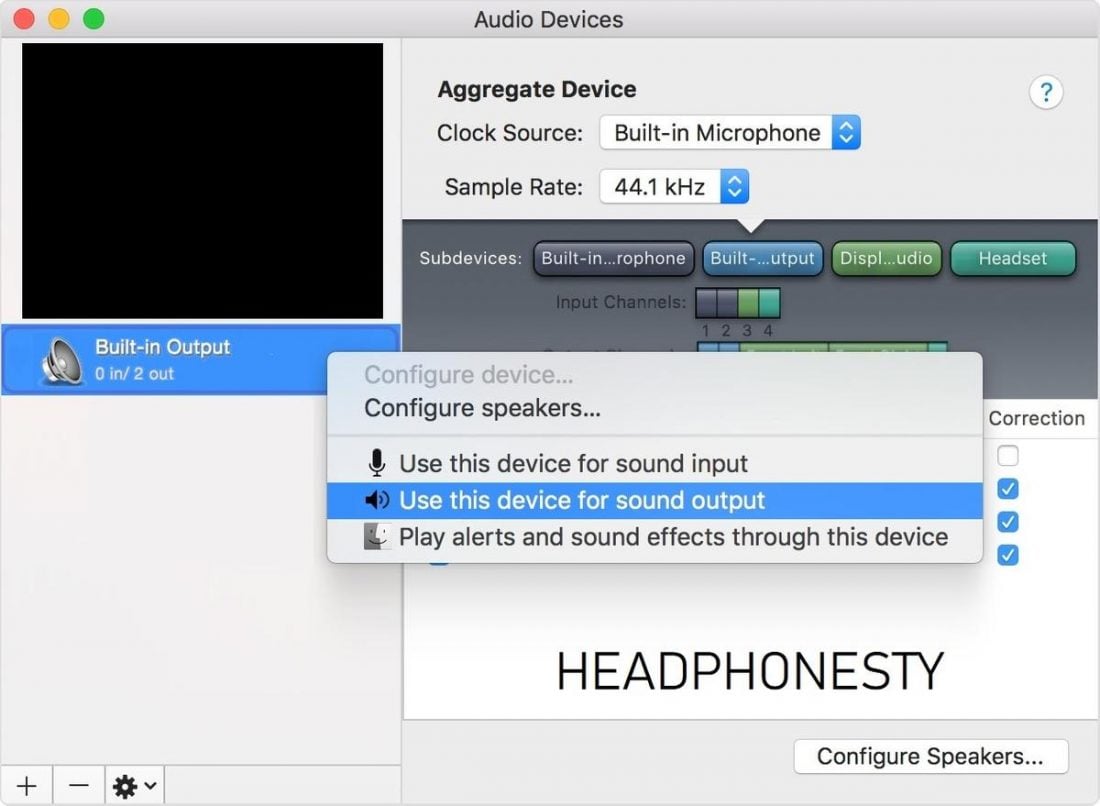
- Go to Applications > Utilities folder > Audio MIDI Setup.
- On the list of available devices shown on the left of your screen, right-click on the "Built-in Output" option.
- Select "Use this device for output".
Audio MIDI Setup on your MAC reckoner
How to Gear up Headphone Static Dissonance Issue on Your PC
There are several approaches and methods yous can attempt in guild to fix static noise on your headphones when using it with a Windows 10 estimator.
Each corresponding approach is highly dependent on the specific problem causing the static sounds, so be absolutely sure of what'southward causing the outcome, beginning, before making permanent changes to your computer.
- Fix Corrupted Drivers or Update Them
- Replace CPU Fan and/or Ability Supply
- Change the Electric current Audio Format
- Disable All Sound Enhancements
- Effort the Windows' Audio Troubleshooter
Fix Corrupted Drivers or Update Them
Sometimes, the chief cause of static racket on your headphones could be having corrupt or outdated drivers. Follow these steps in order to gear up the problem:
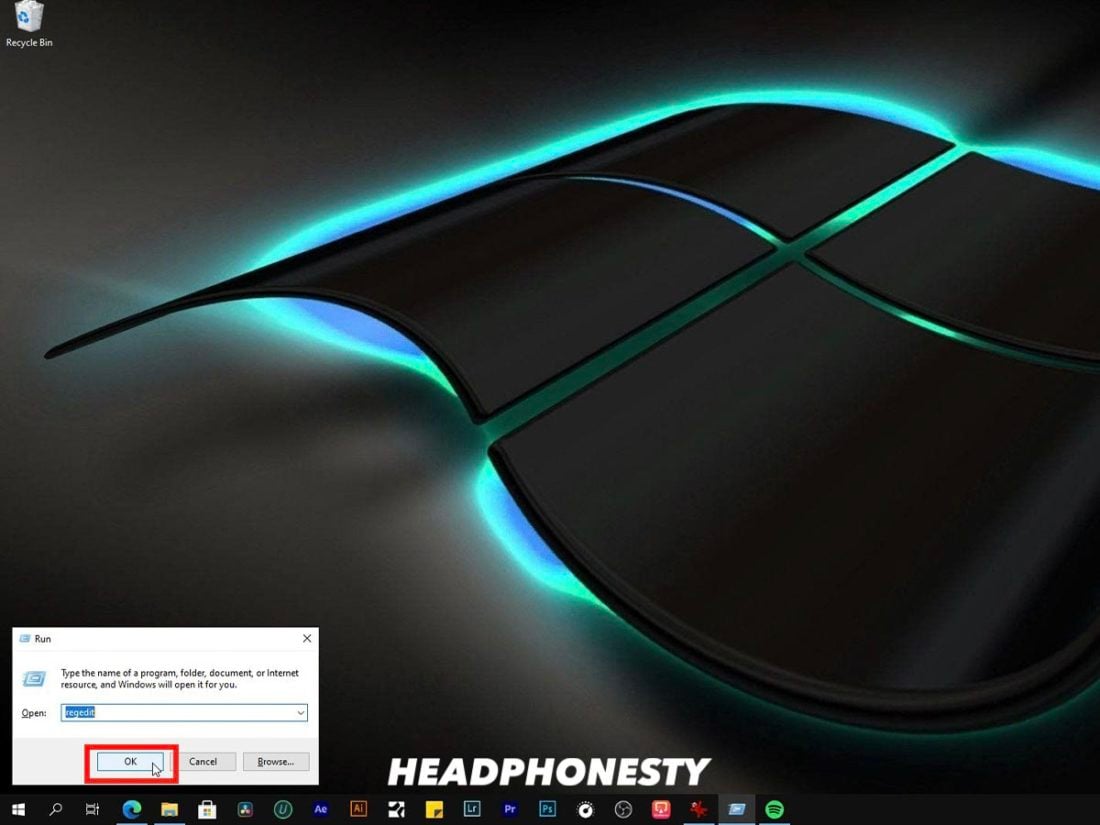
- Press "Windows central + R" then blazon "regedit" to open the registry editor. Click "Aye" if a windows prompt pops up.
Open the Windows registry editor Exist careful when making changes to the registry editor! Any wrong move or improper editing of values can cause major problems on your calculator. Make a backup of your registry (File > Export > Salve) earlier proceeding if y'all want to stay on the safe side.
- Navigate to this role of the registry (you can copy-paste it to the navigation bar on the registry editor):
Computer\HKEY_LOCAL_MACHINE\SYSTEM\CurrentControlSet\Control\Class\{36fc9e60-c465-11cf-8056-444553540000}
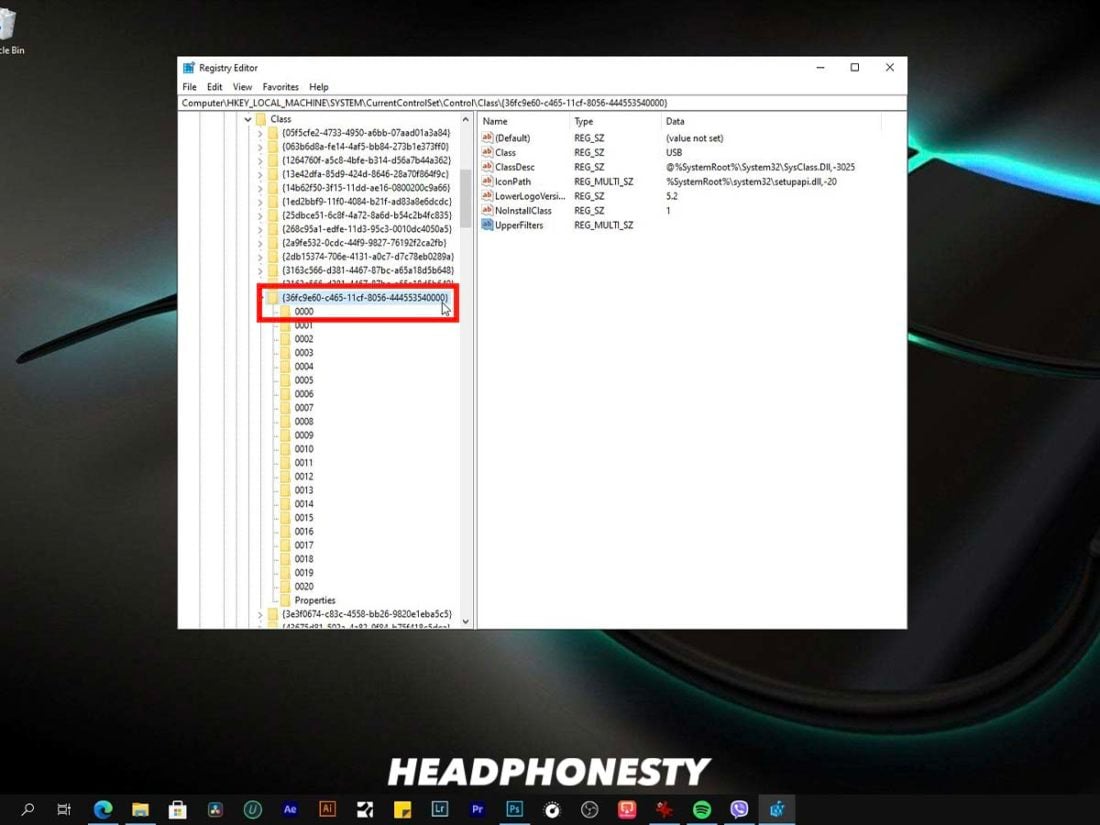
Navigate to Current Control Set - On the right side, you should see "UpperFilters". Go ahead and correct-click on it then select "Delete".
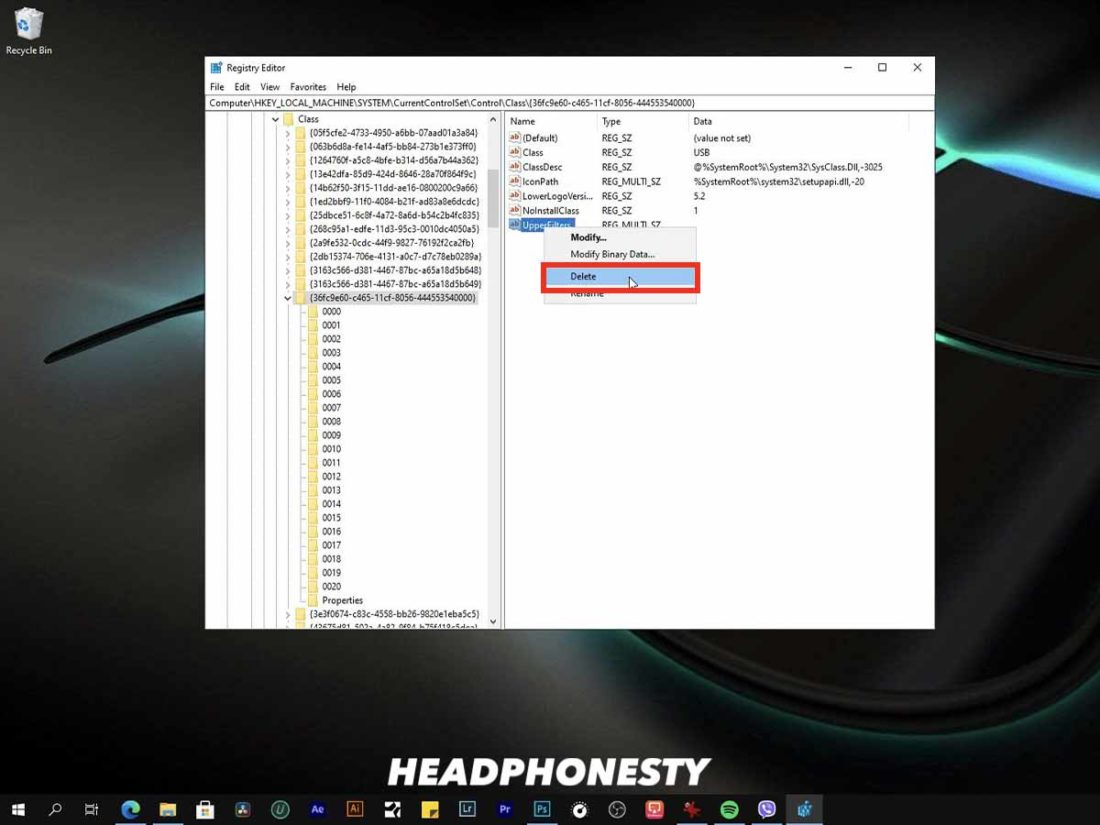
Windows Registry Editor Upper Filters - Close the registry editor and restart your calculator.

Restart PC
If that doesn't fix the problem and the static racket still won't go away, follow these steps:
- Press "Windows key + S" then blazon "Device Manager" and click on "Open" to open up the device director.

Become to Device Manager - Aggrandize Universal Serial Bus controllers and uninstall ALL items that are labeled as controllers.
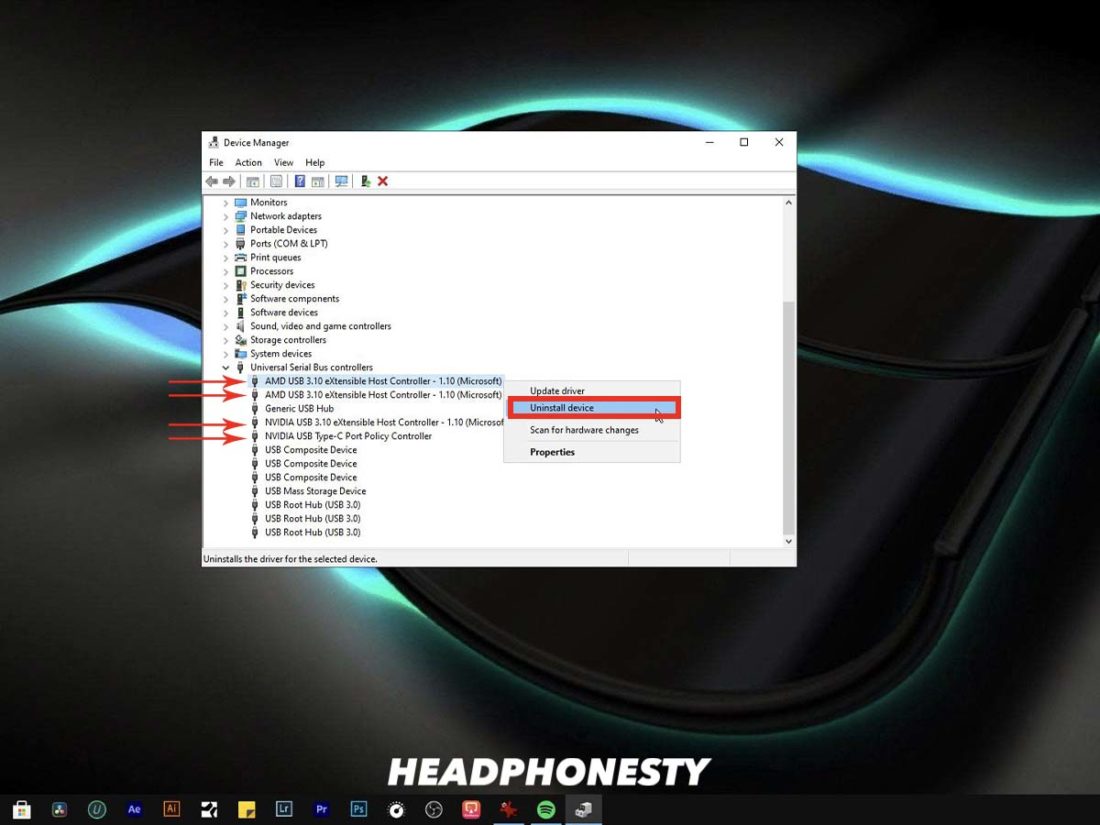
Uninstall Controllers - Shut the device managing director and restart your figurer.
Hither'southward a video of the unabridged process.
Supersede CPU Fan and/or Ability Supply
Static noises can occur when your computer becomes too hot and requires more than ability to operate than usual.
That'southward why replacing your old CPU fan to provide more effective cooling and/or replacing the power supply to provide your computer with more overall ability can be a viable solution to getting rid of the buzzing or static noises from your headphones.
Replacing the CPU Fan
- Unplug the fan's cable from the motherboard.
- Using a Phillips caput screwdriver, unscrew the old fan from the computer case and unplug the cables. Feel free to reuse the former screws if the replacement fan doesn't come with new ones.
- Hold the new fan in the proper mounting position with one hand. You'll know it'due south in the right spot when the screws line up with the holes in the case.
- Screw the fan in place with the other hand and plug in the cables.
- Plow on your computer to see if the static noise is gone.
Here's a video of the entire process.
Replacing the Power Supply

- Unplug the ability cables from the motherboard, hard drives, CD/DVD burners, and whatever other place on the motherboard.
- Using a Phillips head screwdriver, unscrew the old power supply from the computer case and lift it out from the case.
- Plug the new power supply to a wall outlet before installing it on your computer in club to test if the fan is properly working.
- Position the new power supply in the appropriate area and spiral it in place while also plugging in the cables to the appropriate areas.
- Reconnect the power cord and plug your computer back in and then that y'all can turn it on once again.
- Plough on your reckoner to encounter if the static noise is gone.
Alter the Current Audio Format
There's also a hazard the current sound output format is non optimal for the headphones yous're using. Simply modify the audio format using these easy steps.
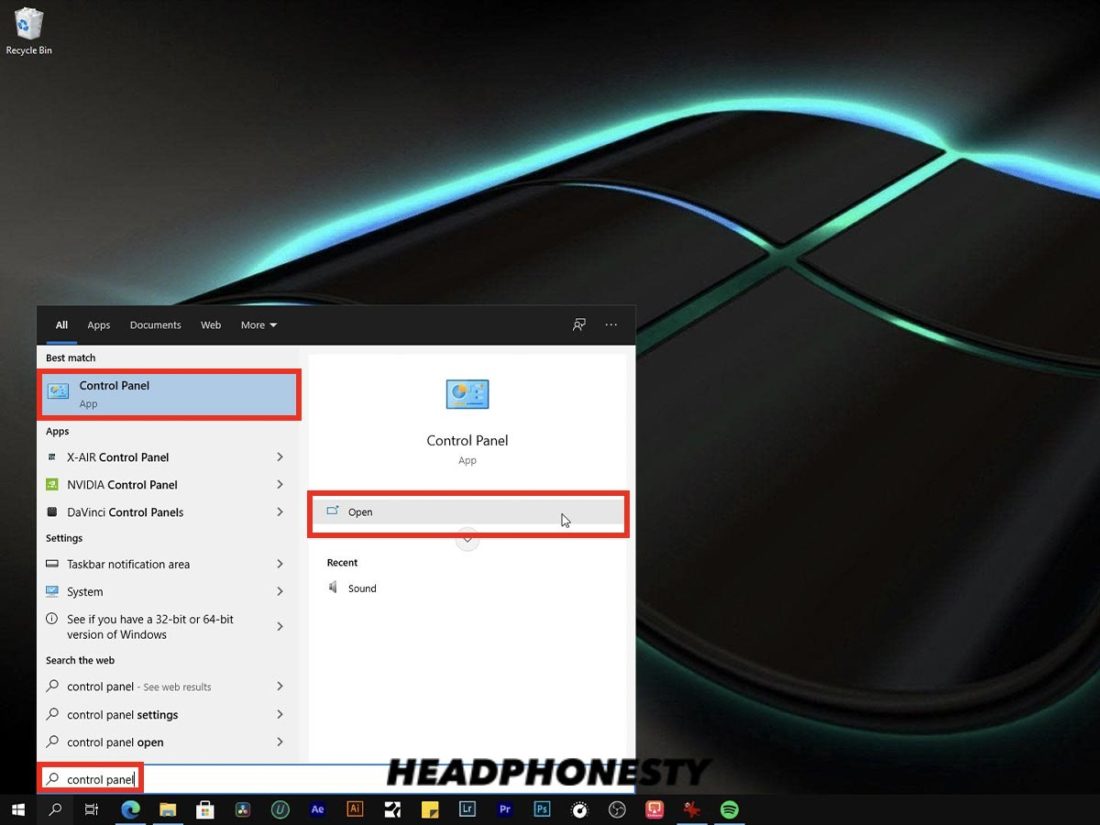
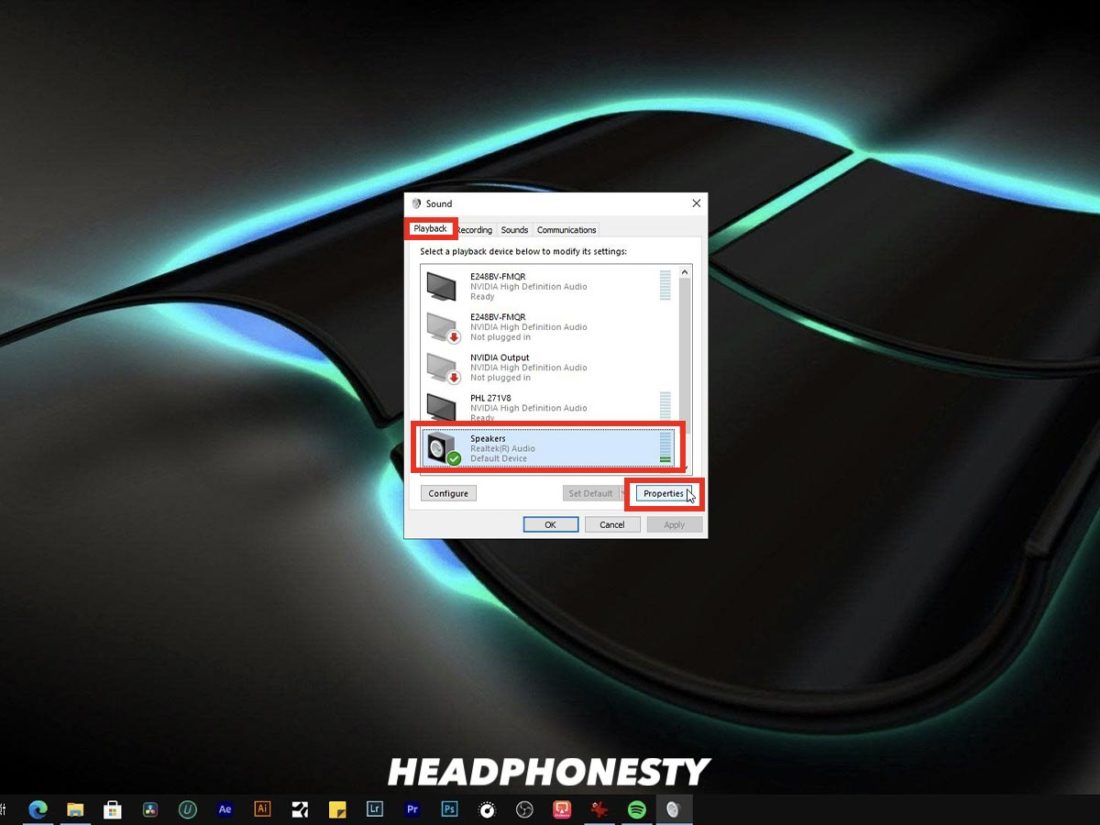
- Printing "Windows primal + Southward" then blazon "Command Panel" and click on "Open" to open upward the command panel.
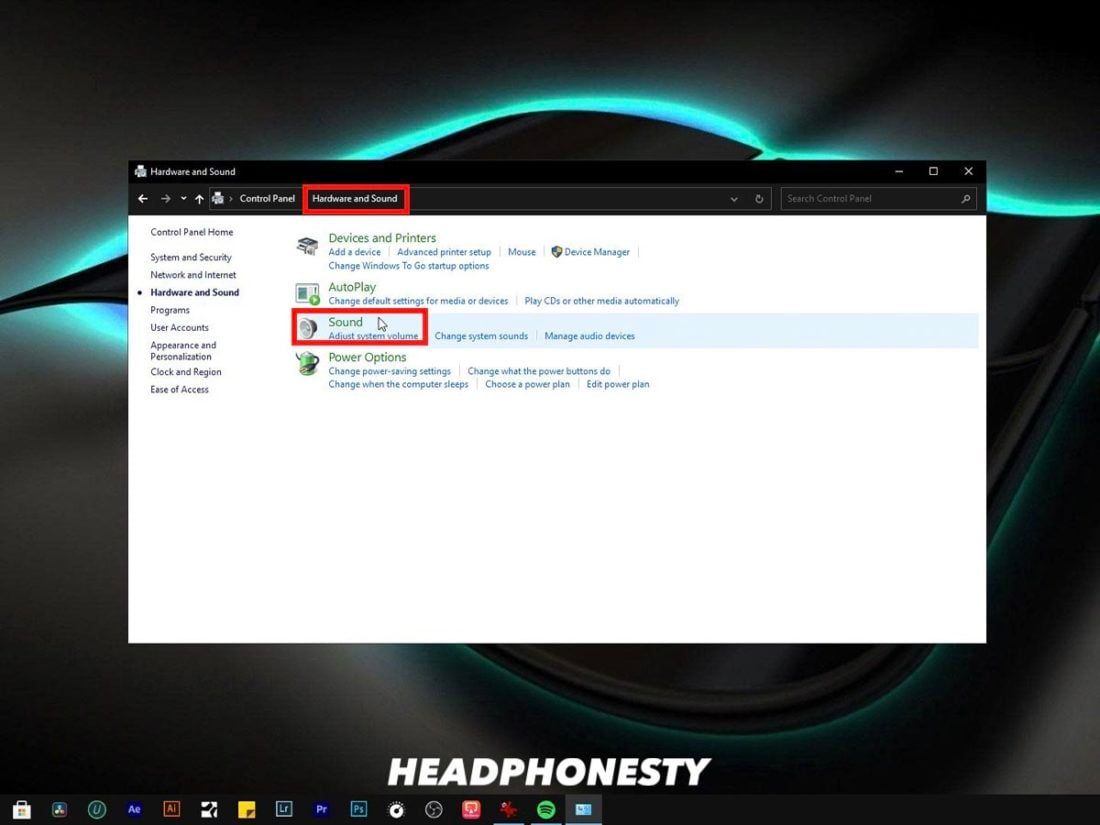
Open the Control Console - Become to Hardware and Audio then Sound.
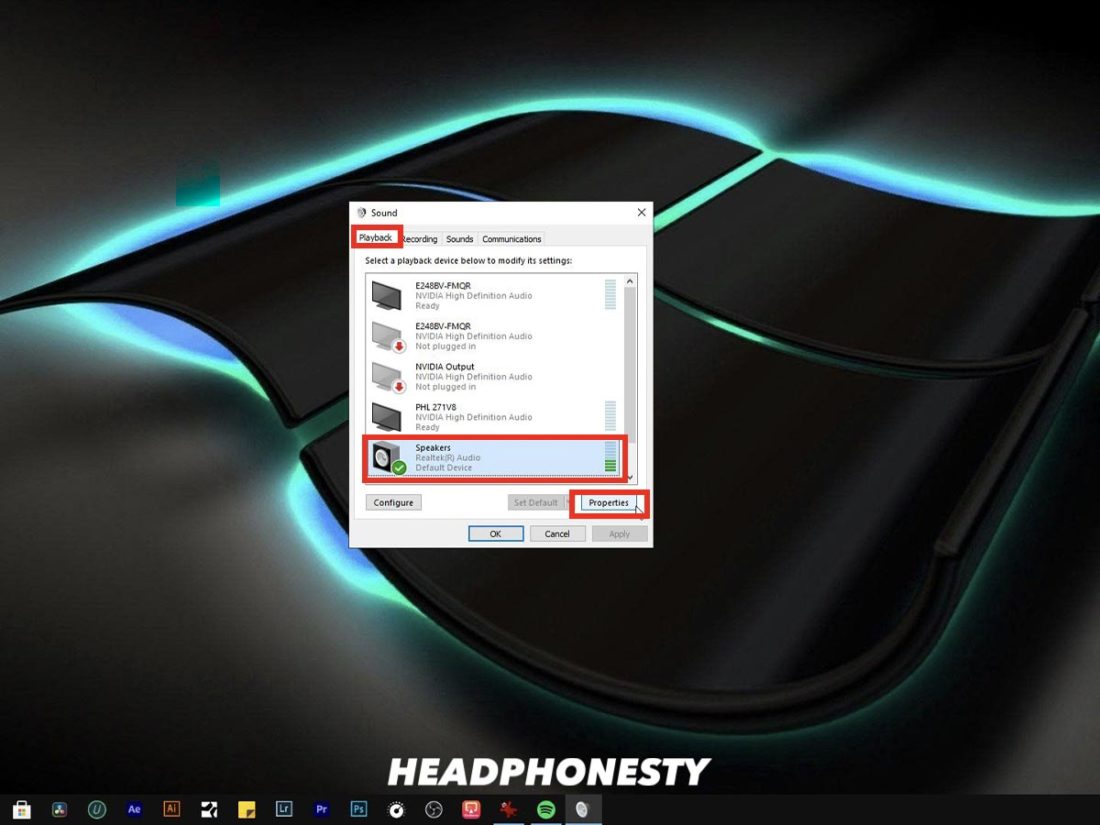
Go to Sound Settings - Nether the Playback tab, right-click on Speakers, so click on Properties.
Speaker Backdrop - Navigate to the Avant-garde tab and nether Default Format, modify the sound format. Click on Utilize then OK.
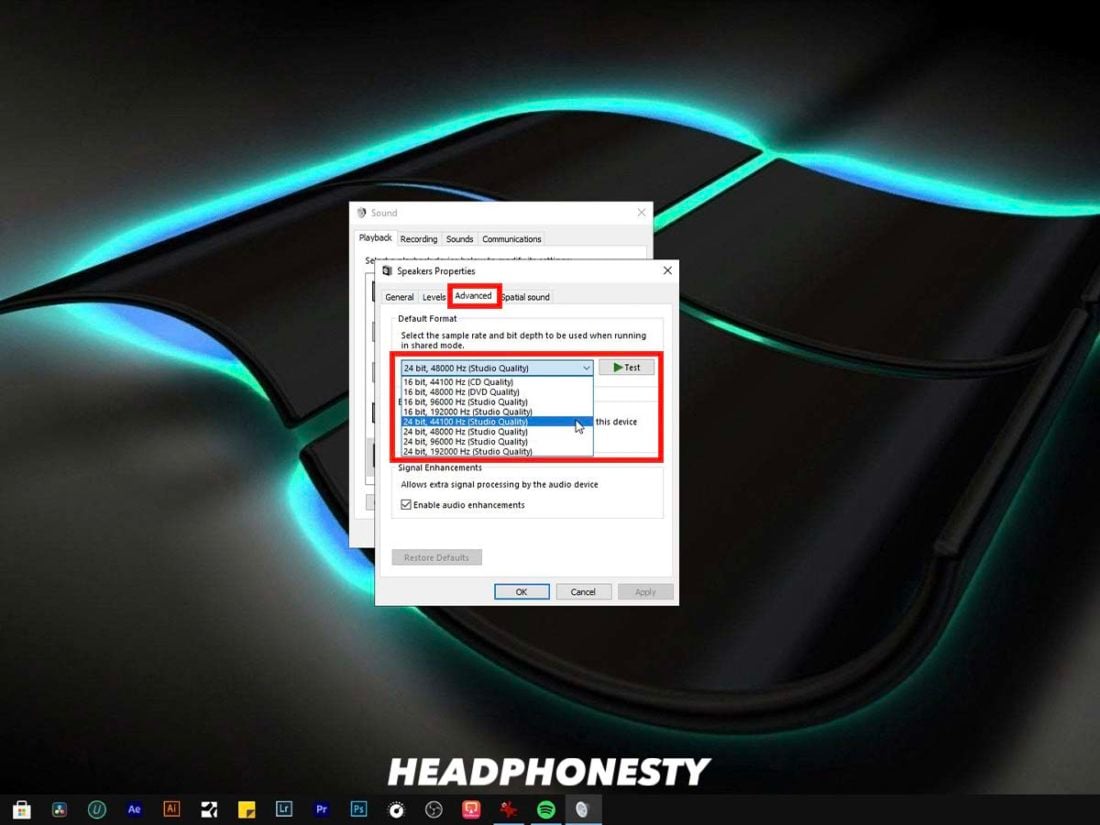
Changing the Audio Format on a Windows 10 Calculator
The static noise problem unremarkably goes away when changing the sound format to 24 bits.
Disable All Audio Enhancements
Sound enhancements can also contribute to the static dissonance in your headphones. Disabling them will let you to get rid of the crackling or buzzing sounds altogether.
- Press "Windows key + S" then blazon "Control Panel" and click on "Open" to open up the control panel.
- Go to Hardware and Sound then Sound.
- Under the Playback tab, right-click on Speakers, then click on Properties.
- Navigate to the Enhancements tab and under Arrangement Effects Configuration, tick the checkbox next to "Disable all sound effects". Click on Apply then OK.
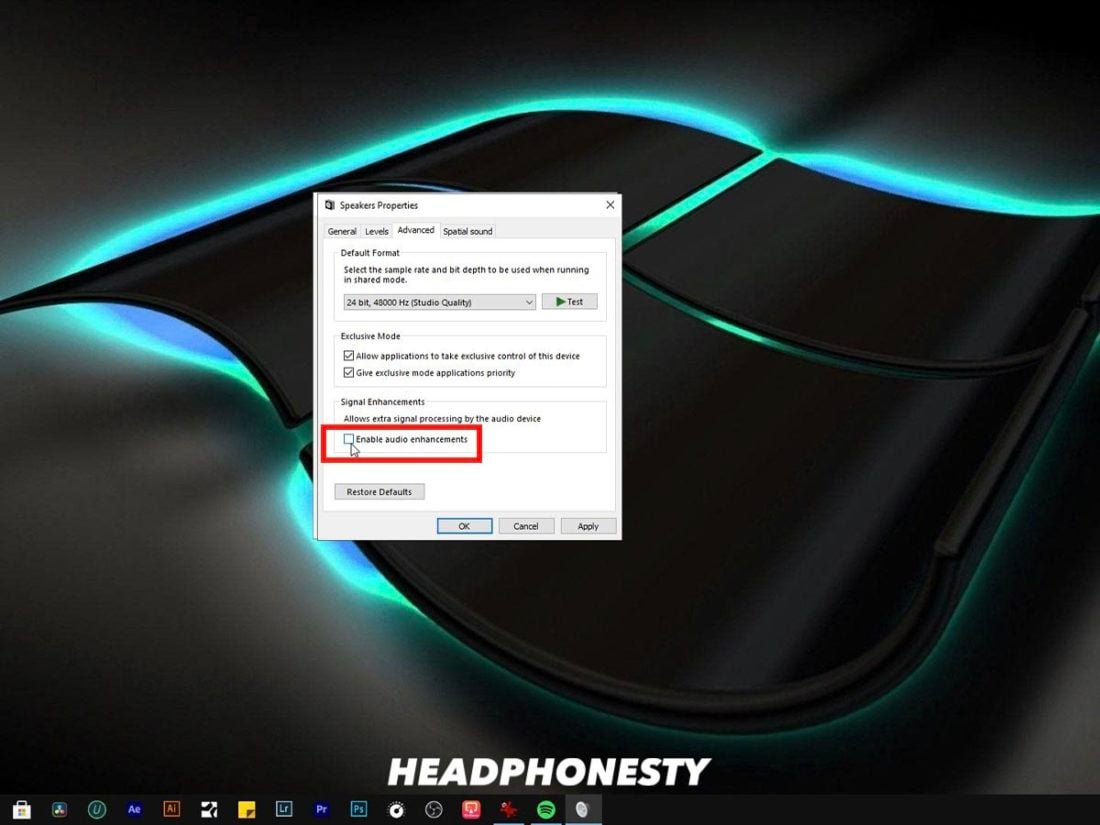
Enhancements tab on speaker Properties
Hither's a video of the entire procedure.
Effort the Windows Audio Troubleshooter
Windows also comes with its ain troubleshooter to endeavor and solve specific issues. Simply launch the corresponding troubleshooter and it volition accost the problem on its own.
- Press "Windows key + Due south" and so type "Settings" and click on "Open" to open up up the computer settings.
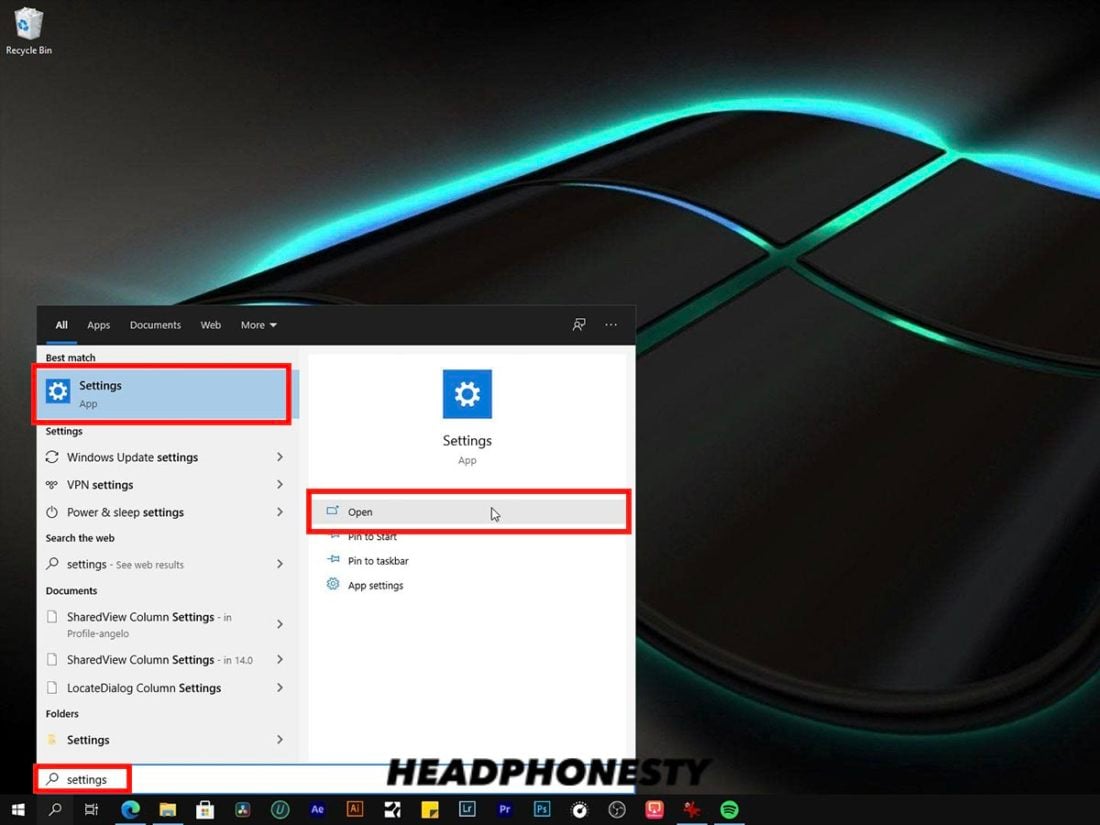
Go to Settings - Go to Update and Security then head to the Troubleshoot tab which tin can be found at the left side of the screen.
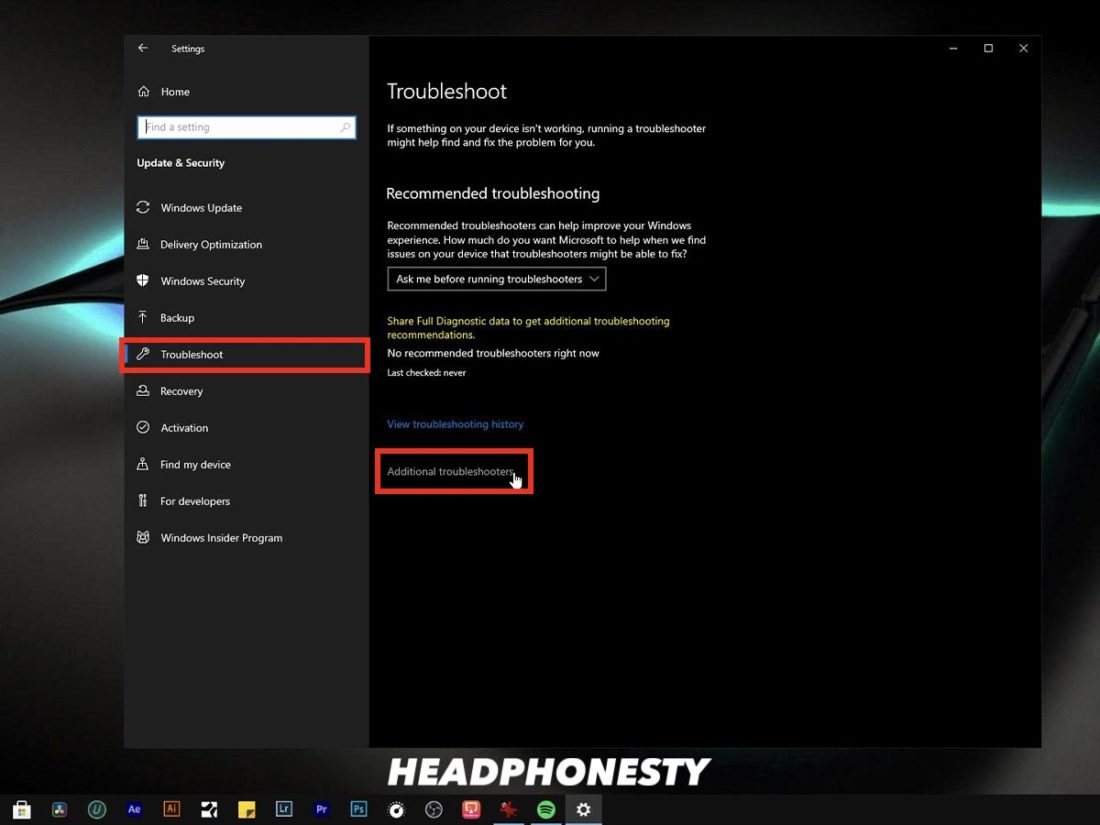
Update and Security Troubleshoot option - Under "Get up and running", click on Playing Audio then Run the troubleshooter.
Run the troubleshooter
How to Set up Headphone Static Racket Issue on Your iPhone
Experiencing static noises using iPhones is very uncommon (with the exception of iPhone eight), with most users having no issues after being able to install the latest iOS patch. If you still feel this problem, hither's what you should practice in order to become rid of the static racket on your iPhone.
- Do a Soft Reset
- Check for Debris
- Turn the "Do Non Disturb" Feature Off
- Close All Running Apps in the Background
- Restore the iPhone
Do a Soft Reset
Turning your iPhone on and off is a simple, however effective solution to solving the problem. Hither's how y'all do it:
- Concur the Ability Button of your iPhone for a few seconds until yous see the "Slide to Ability Off" screen.
- Drag the slider to turn off your iPhone.
- Wait for a minute or then, so agree the Power Button again for a few seconds until y'all see the Apple tree logo.
- Examination to see if the static problem persists.
Check for Debris (for iPhones With Headphone Jack)
With extended employ, your headphones or earphones can have a buildup of dirt and debris which can affect the overall audio that you hear. It's e'er all-time to keep your devices clean in social club to avoid this specific problem.
- Check your iPhone'due south audio port for any dirt or debris.
Checking the headphone port - Inspect your headphone cable and audio jack for damage and breakage.
- Look at the meshes of each of your headphone speakers or earbuds for clay or debris. Using a soft-bristled brush, advisedly clear out each opening until none of the debris remains.
- Plug your headphones back to your iPhone. Brand certain that information technology has a tight and snug fit by removing the iPhone instance if you lot're using one.
Turn the "Do Not Disturb" Feature Off
The Do Not Disturb feature (DND) is a really useful characteristic that people generally use in club to mute calls, notifications, and sounds that you would usually receive while your iPhone is locked. It can be used to put a scheduled timeframe on when you can receive calls and notifications.
Yet, in that location are times when your iPhone may human activity differently with DND turned on. If you lot experience static noises while DND is on, then information technology may be best for you to turn the feature off. Here's how you do it:
- Go to your iPhone's Settings.
- Navigate to the Exercise Not Disturb menu.
- Press the toggle button to turn it off.
Close All Running Apps in the Background
Having multiple apps running in the background may exist great if yous want to multitask, but information technology can crusade bug, specially if any of those apps' processes gets corrupted or crashes.
That's why information technology's best to quit all apps that you aren't using in standby mode to foreclose this from happening. Here's how to exercise that:
- Printing the Home button for a few seconds and open the App Switcher.
- Preview your apps past swiping upward on the app'south preview then motion-picture show information technology upwards the screen in order to quit the process.
Restore the iPhone
This choice is usually reserved for the more complex software issues with your iPhone such every bit a faulty software update. At that place are 3 types of iPhone software restoration that yous can practise and hither are instructions for each of them
Standard iOS Restore
- Connect your iPhone to your figurer.
- Open iTunes and click on the device push (looks like a phone) which is near the elevation left portion of the iTunes window.

The device button on the iTunes window (From: support.apple tree.com). - Click on Summary, then Restore then you can showtime the procedure of restoring your iPhone to a previous state.
- Follow the onscreen instructions to fully restore the device.
Recovery Mode Restore
To do Recovery Way Restore, you simply have to put your iPhone in recovery manner before proceeding with the aforementioned steps as the standard iOS restore. Here'south how to put your iPhone in recovery mode:
- Connect your iPhone to your estimator.
- Open up iTunes.
- Printing and release the Volume Up so the Volume Down button.
- Press and hold the side button until you run into that your iPhone is in recovery mode.
DFU Mode Restore
The DFU mode restore is the most in-depth type of restore and is usually only performed by Apple technicians and professionals. Your iPhone can communicate with iTunes without having to load up its operating system when put in DFU fashion.
- Connect your iPhone to your computer.
- Open iTunes.
- While your iPhone is connecting, operate your iPhone to put it into DFU fashion.
- Printing and release the Volume Up then the Volume Downwardly push button.
- Press and concur the side button until you meet the iTunes icon on your iPhone.
- Click on "Restore" on the pop-up window that appears on your computer.
How to Set Headphone Static Noise Issue on Your Android Device
If your Android device has been dropped or has gotten wet (if the phone isn't water-resistant) recently and you noticed a static noise that just won't go away, then it is most probable a hardware consequence that needs to exist addressed.
Still, if none of those happened and yous've properly taken care of your device, then proceed with the following fixes.
- Install the Latest Software Updates
- Plow Wi-Fi Off and Switch to Mobile Data
- Do a Manufacturing plant Reset
Install the Latest Software Updates
Software bugs are non uncommon and they tin can sometimes affect the overall performance of your Android device and cause static noises on your audio. Information technology'due south always best to install the latest software updates on your Android device in club to avert such instances. Here's how to exercise information technology.
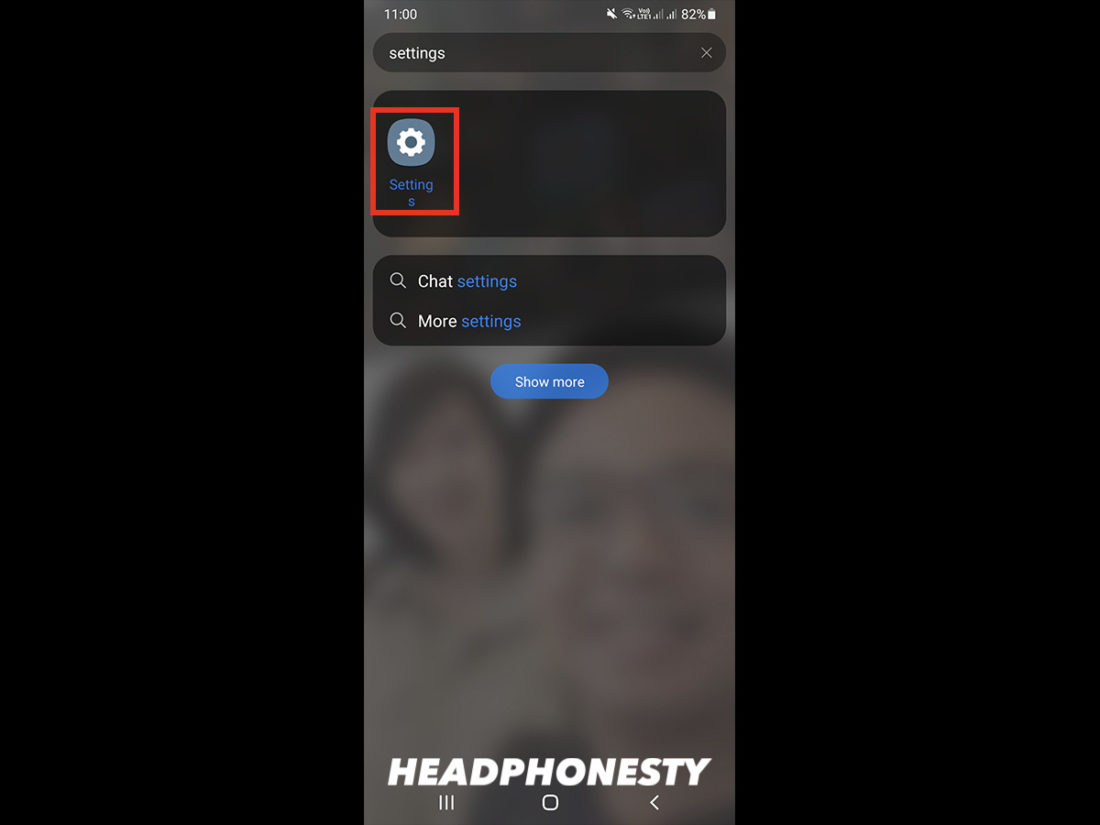
- Get to your Android'due south Settings.

Android's Settings - Navigate to Nearly Phone.

Nigh Telephone - Click on System Update and your telephone will update with the newest version software, if bachelor.
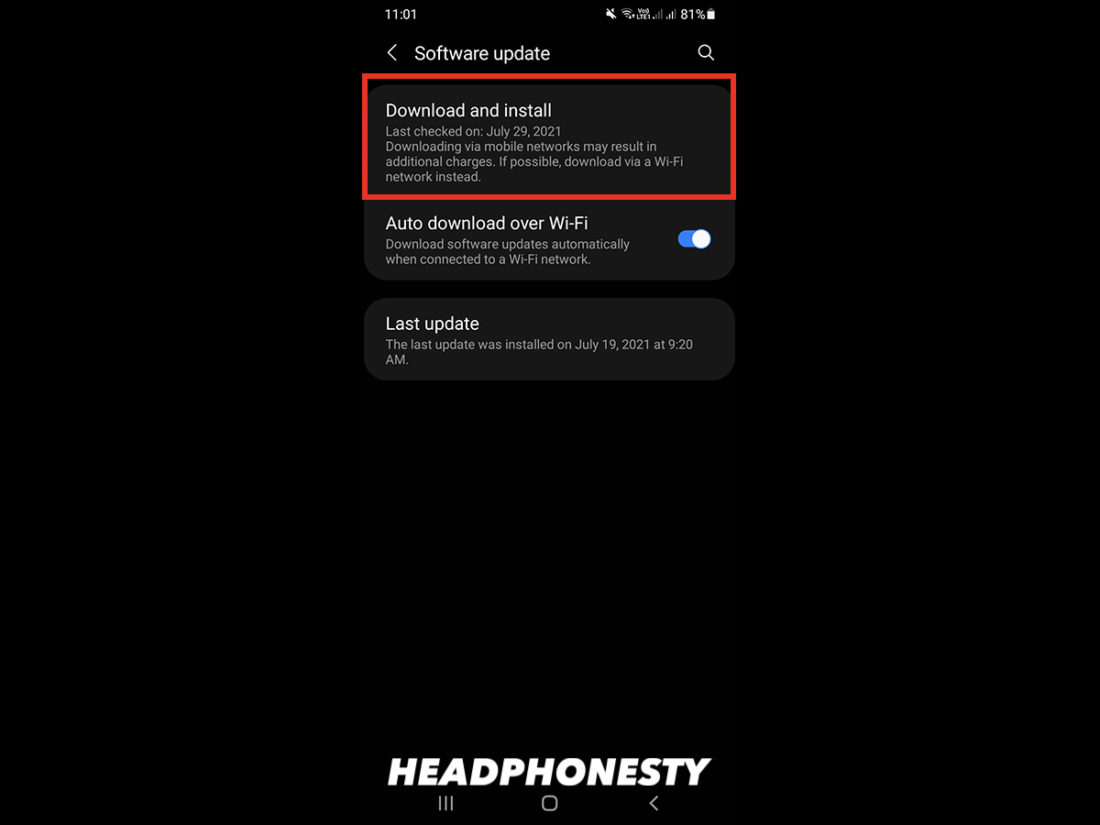
Arrangement Update
Turn Wi-Fi Off and Switch to Mobile Data
If you feel the static noise problem when y'all're streaming videos online, then the problem may be due to overloaded Wi-Fi. Simply switch over to mobile data if possible.
- Go to Settings.
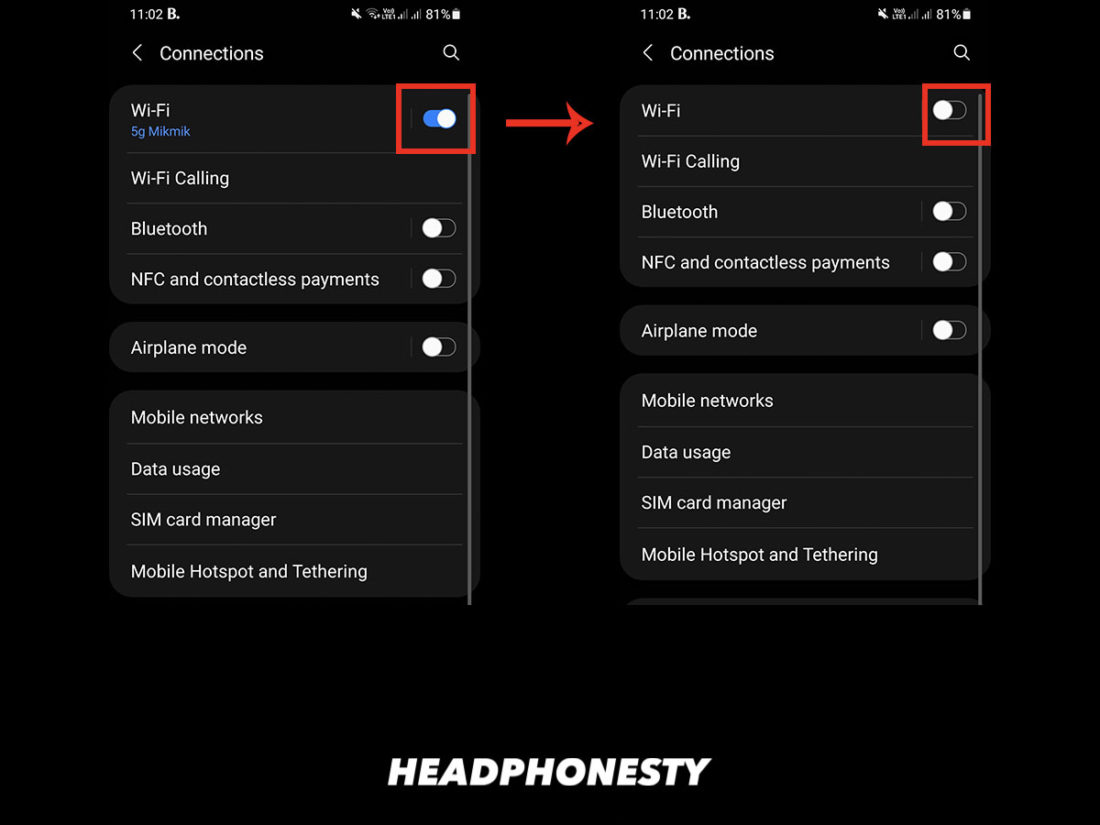
Go to Android Settings - Head to Connections.
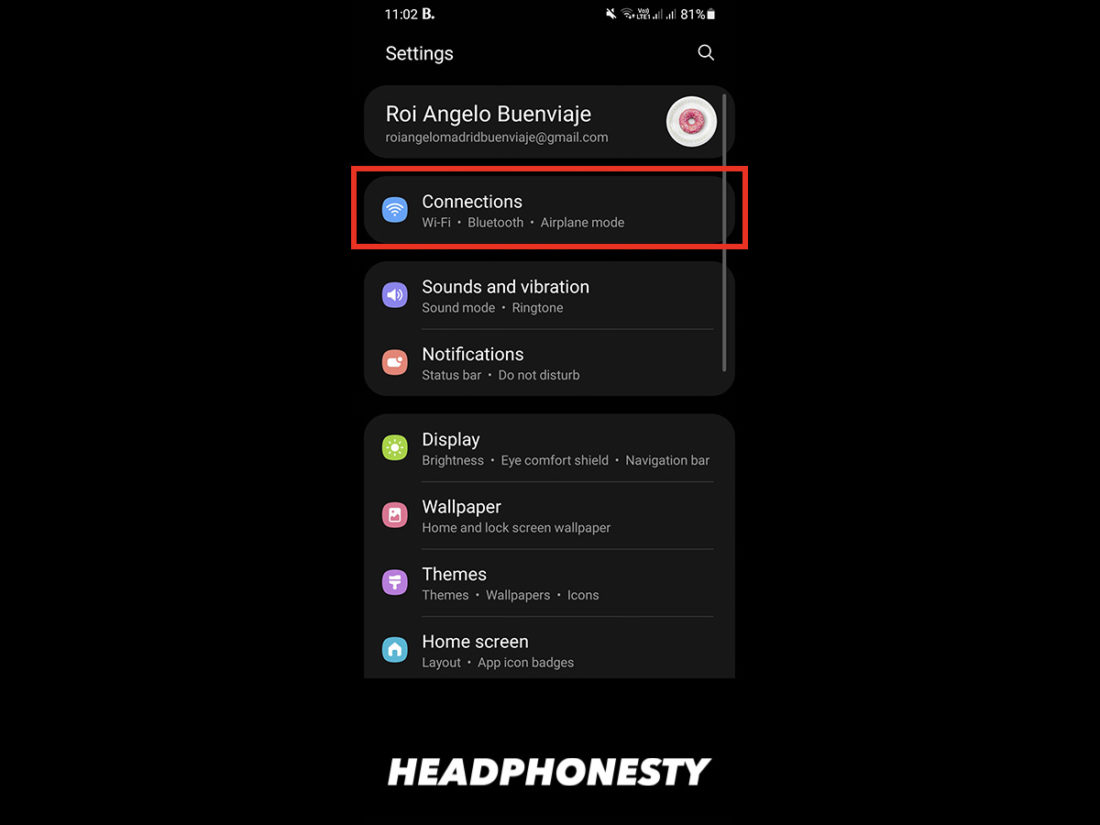
Connections Settings - Click on WiFi and turn the slider off.
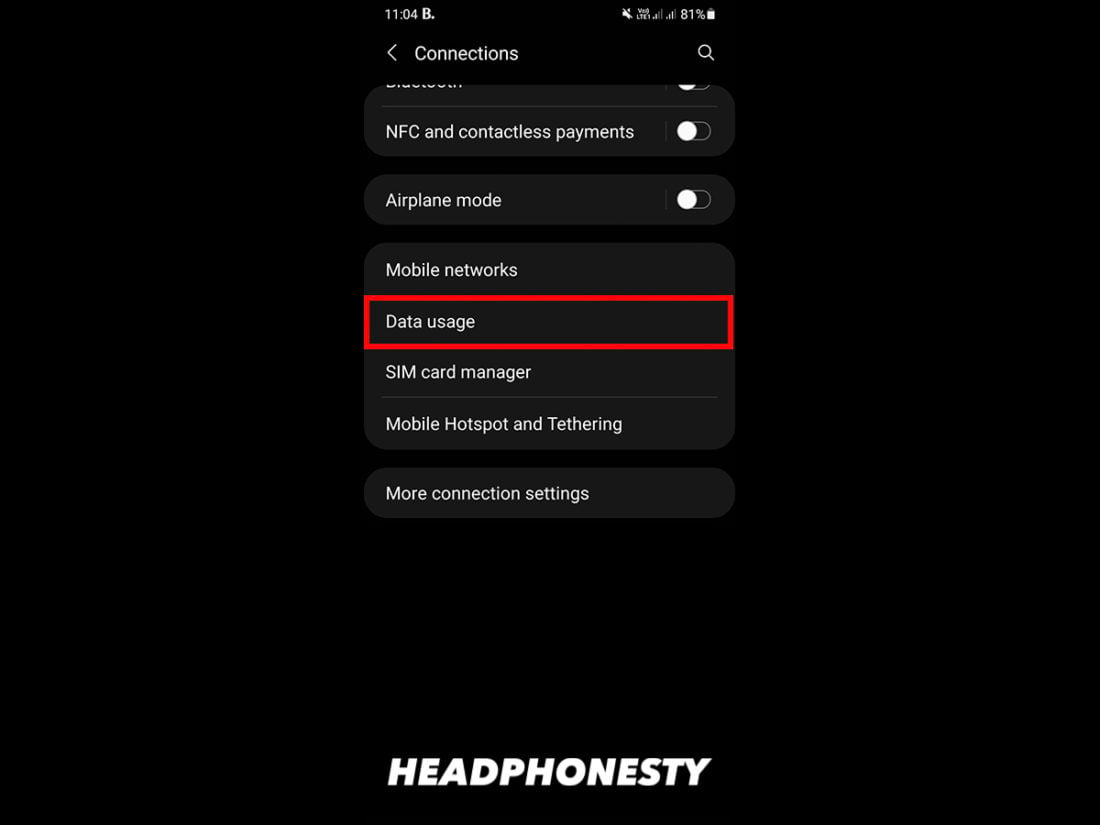
Disable WiFi - Scroll downwardly and click on Data usage.
Information Usage - Go to Mobile Data and turn the slider on.
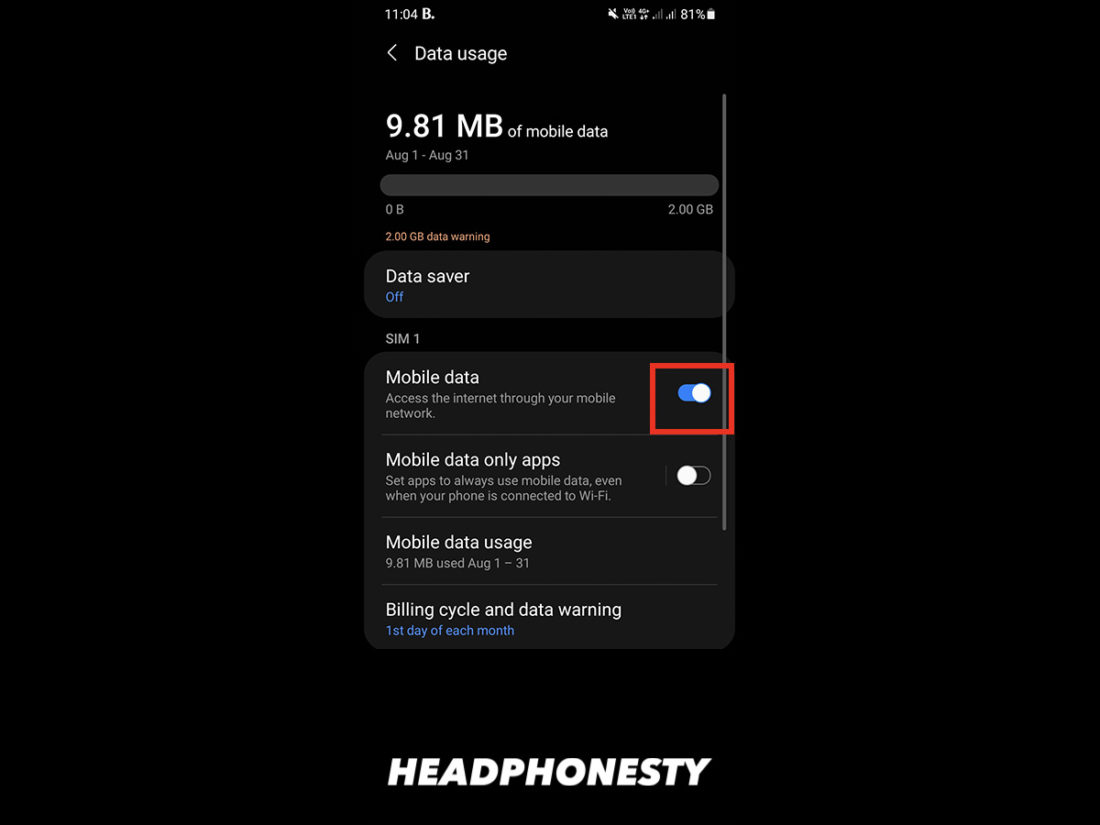
Turn on Mobile Data
Do a Manufactory Reset
When doing a factory reset, you're basically wiping everything from your phone and starting fresh as if your phone was brand new. Exist sure to backup all of your of import photos, videos and files before proceeding with these instructions.
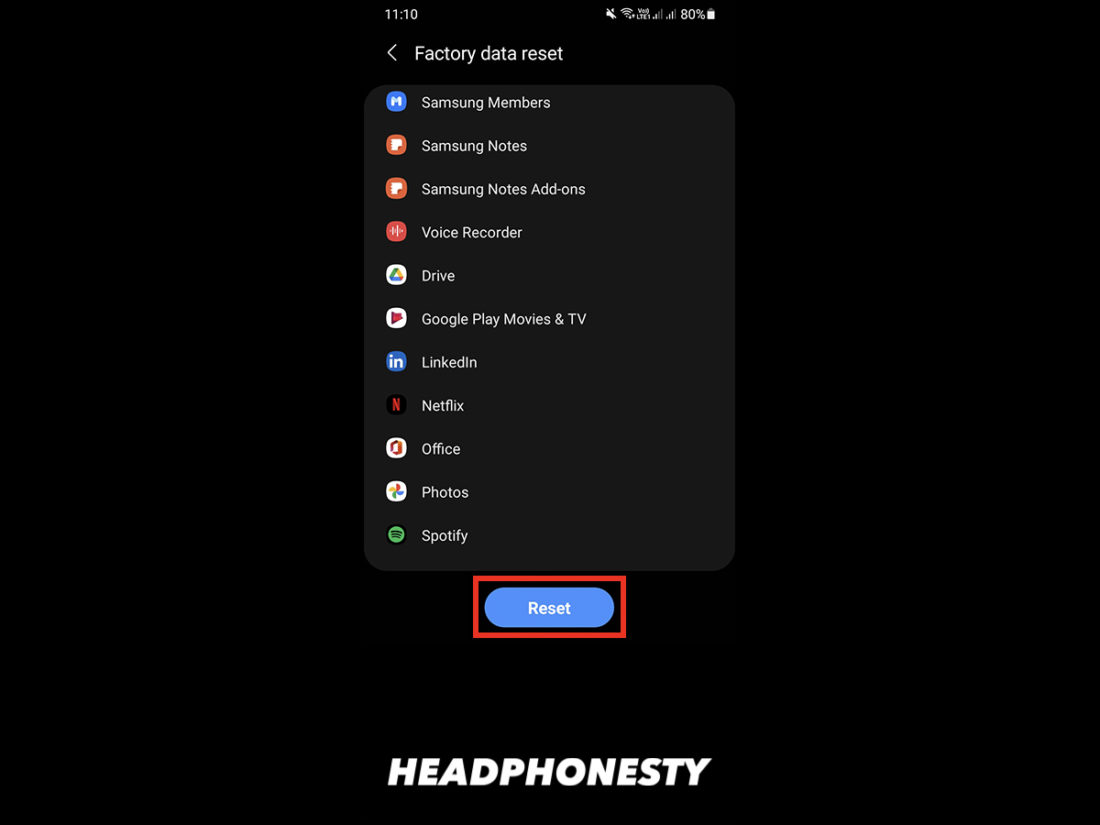
- Get to Settingsand choose General Management.
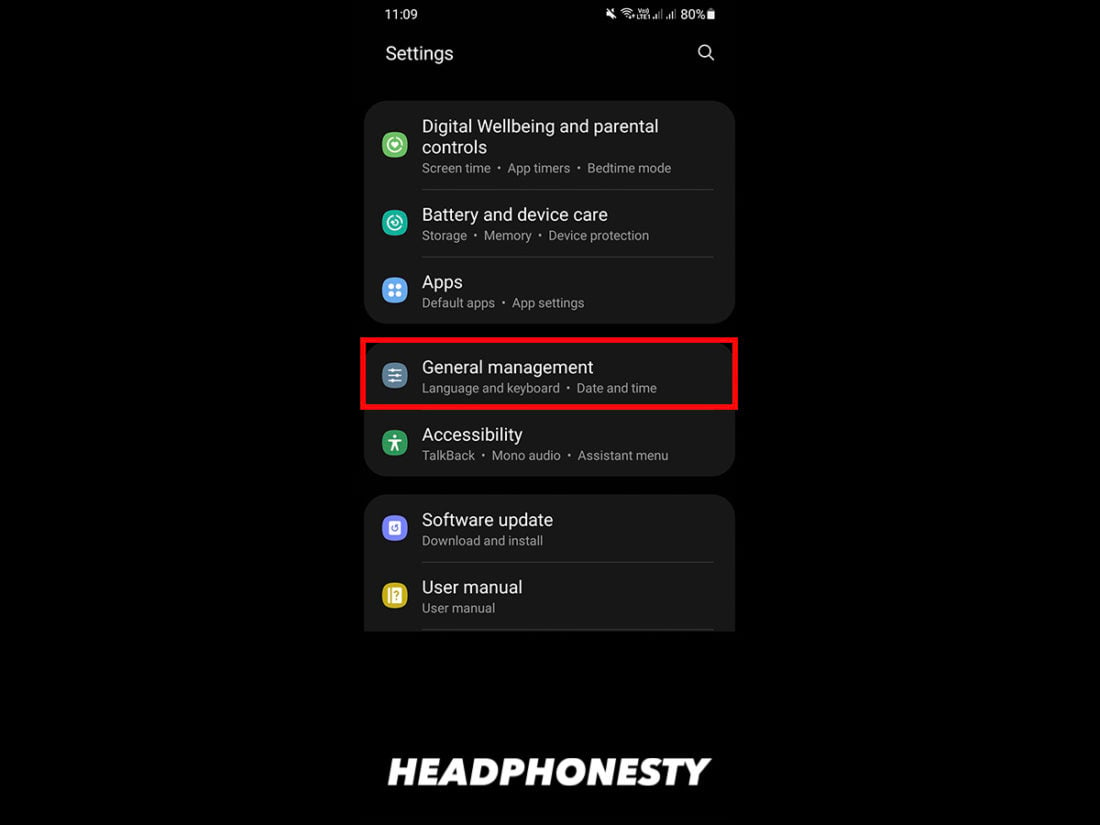
General Direction Settings - Tap on Reset.

Backup & reset - Check if all relevant apps are listed so click on R eset.
Erase all data
How to Prevent Static Noise in Your Headphones
While software glitches and hardware problems with the audio source tin can often happen without alarm, there are some preventative measures and best practices you can practise in order to minimize the occurrence of static racket in your headphones.
Clean your headphones jack and port regularly
Regularly cleaning the headphone'south audio jack and your audio device'south auxiliary port tin can aid prevent the buildup of dust and debris, which is actually 1 of the more than common causes of static noises.
Simply have a cotton bud or Q-tip and slightly rip off the excess cotton fiber until the wad is small plenty to fit inside the auxiliary port of your audio device. Lightly soak the cotton bud with isopropyl booze (preferably use control/contact cleaner/lubricant if you have it) then make clean the within of the auxiliary port of the playback and audio jack of your headphones.
Always cheque your headphone wires
Headphone wires are susceptible to loosening or getting damaged over time with connected apply, which tin lead to static racket. Bank check sections of the wire for damage, specially on the connection with the iii.5mm audio jack of the headphones. Always grab the wire past the headphone jack and not the wire itself when inserting or removing it from the aux port.
This style, your headphones can exist rubber from different potential problems. Some of these bug include headphones not working on one side, or brusque circuits in headphones.
Consider an upgrade
If y'all've been using the same pair of headphones for several years now, so it may be possible that it is only time for you to consider upgrading into a newer device.
Experiencing audio issues such as static noise is normal for headphones that have been in use for a long time. It is the natural degradation of the production, and if you don't desire to bargain with such issues, then it might be best to just get a new pair of headphones.
Make sure to follow the recycling protocols when replacing broken headphones, though
Conclusion
With this guide, you lot tin can at present quickly set your problem and get rid of static noises on your headphones. Whether you're using your headphones on your mobile phone or calculator, y'all tin can rest easy knowing what the root causes of the static noises are and how you can address those specific problems.
Hopefully, this guide has helped you say goodbye to headphone static issues. Even so, if you start experiencing whatever other headphone issues, experience free to bookmark our ultimate guide to fixing cleaved headphones.
Were you able to solve the problem and get rid of the static noise from your headphones? Exercise you need farther help or aid? Please feel complimentary to let us know in the comments below! We'll be glad to give you further insight on any problem that you may have.
Source: https://www.headphonesty.com/2020/07/hear-static-in-headphones/
0 Response to "Hyperx Cloud 2 Wireless Static Noise"
Post a Comment